Toilet Repair Guide: Toilet Parts Diagram & How to Fix a Toilet
When you run a small business, even minor plumbing problems can cause major headaches. A toilet that won’t flush or keeps running isn’t just inconvenient; it can impact your staff, customers, and day-to-day operations. You don’t need to be a plumber to fix simple toilet issues. Understanding the basic parts of a toilet, how they work, and how to handle common repairs can save time and keep your facility running smoothly. This toilet repair guide breaks down each part, offers step-by-step tips for small fixes, and includes a toilet maintenance checklist to help prevent future problems.
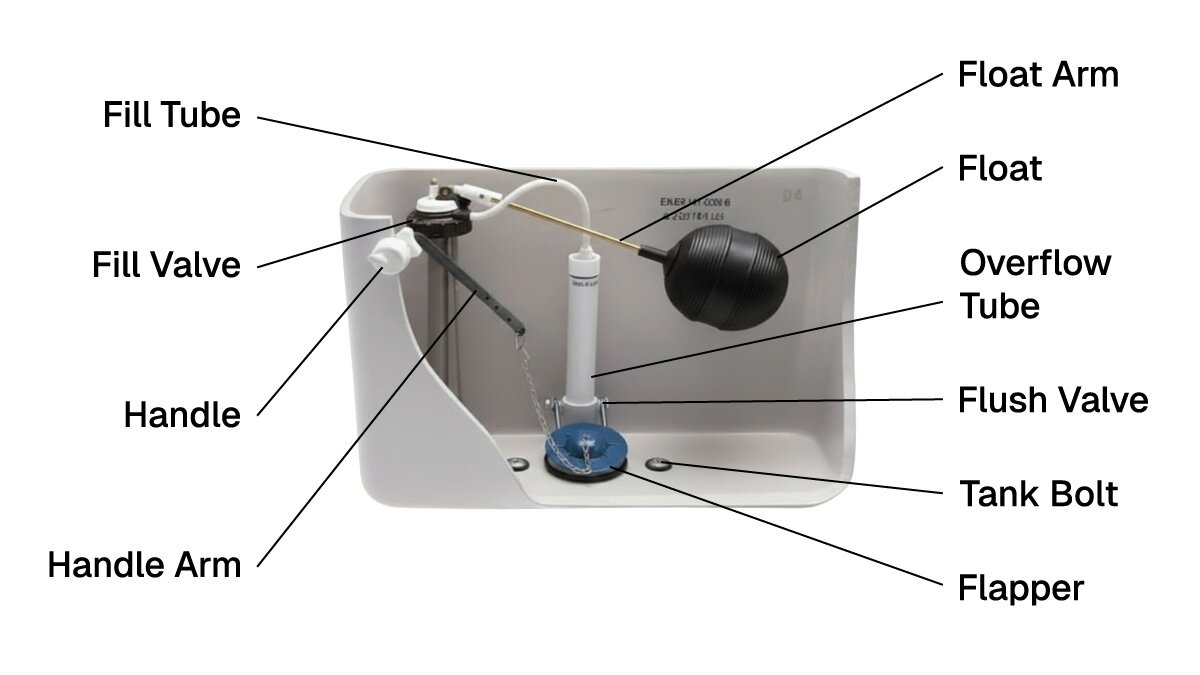
Toilet Tank Parks
Here’s a quick overview of the most common toilet tank parts and what they do. Knowing these terms makes it easier to identify the issue or talk to a maintenance pro if you need backup.
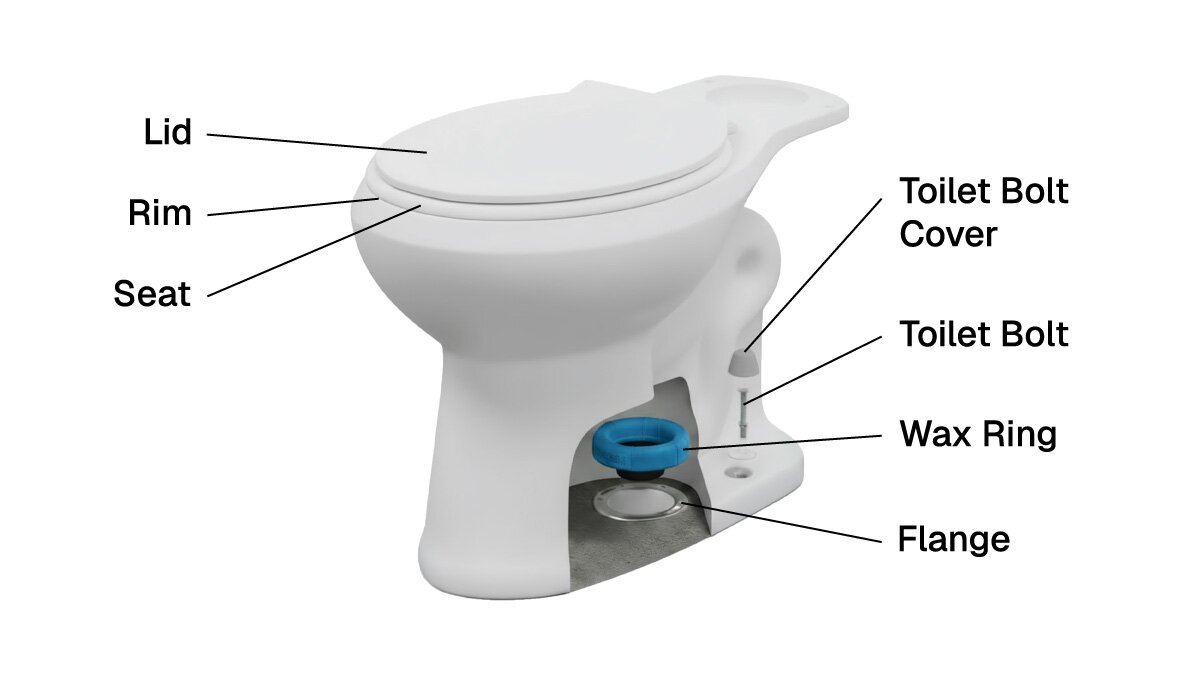
Toilet Bowl Parts
How to Fix Common Toilet Problems
Even without plumbing experience, there are a few maintenance tasks most business owners or maintenance teams can manage safely. Below are the most common issues and fixes.
Running Toilet
If you hear water running long after a flush, the toilet’s likely running continuously. This usually happens when the flapper doesn’t seal, the float is set too high, or the fill valve is worn out.
Start by turning off the water supply and flushing to empty the tank.
Check the flapper first—it’s the rubber seal at the bottom. If it looks warped or brittle, replace it.
Then adjust the float so the water stops about an inch below the overflow tube.
If the sound continues, a toilet fill valve replacement may be needed. Most valves are easy to swap: remove the old one, install the new valve as directed, reconnect the water line, and test the flush. These small fixes often stop the constant flow and help prevent higher water bills.
Toilet Won’t Flush or Has a Weak Flush
When a toilet won’t flush, it’s often something simple. The chain between the handle and flapper might be loose, the water level could be too low, or the flapper may not seal properly.
Lift the tank lid and check that the chain is connected and has a bit of slack.
Adjust the float to allow the tank to fill higher, and replace the flapper if it’s stiff or cracked.
If you’ve tried these steps and your toilet still won’t flush, buildup in the jets or a clog could be to blame. At that point, calling a plumber is usually the best move.
Leaking Around the Base
A small puddle around the base of your toilet often means the toilet seal (also called the wax ring) needs to be replaced. It’s what connects your toilet to the drain line and keeps water where it belongs.
Turn off the water and drain the toilet completely.
Loosen the bolts at the base, lift the toilet straight up, and remove the old wax ring.
Clean the area, place a new toilet seal on the flange, and reseat the toilet carefully.
Tighten the bolts evenly, but don’t overdo it—too much pressure can crack the porcelain.
Turn the water back on and check for leaks.
If the leak returns or the floor feels soft, it’s time to call a pro.
Loose or Broken Handle
A loose or wobbly handle can make flushing unreliable. Most of the time, the nut inside the tank has loosened, or the handle arm has corroded.
Lift the tank lid and check the handle connection.
Tighten the nut gently—it may be reverse-threaded. If the handle is damaged, replace it.
Toilet handle repair is quick and inexpensive. Most new handles come with the lever arm attached. Install the new one, reconnect the chain with a little slack, and your toilet should flush smoothly again.
Simple Toilet Maintenance Checklist
Use this checklist for routine checks in your restrooms, especially in high-traffic areas like retail stores, restaurants, or offices.
Listen for continuous running after each flush.
Check water level (should stop just below overflow tube).
Inspect the floor around the toilet for moisture.
Ensure handles and flushes feel firm.
Replace flappers every 1–2 years or as needed.
Keep a few common toilet repair parts (flapper, fill valve, handle) on hand for quick fixes.
When to Call a Professional
If the toilet rocks when you sit, water leaks continuously from the tank, or you notice cracks in the porcelain, it’s time to call a plumber. For most small leaks, running water, or flush issues, though, the fixes above can keep your facilities in working order until professional service is available.
Wrapping It Up
You don’t need a plumbing license to handle basic toilet maintenance. By learning the parts of a toilet and understanding how they work, you can handle simple repairs, keep costs down, and prevent disruptions to your team or customers. And when you do need replacement parts—from toilet flush valve parts to flappers and seals—Zoro makes it easy to find exactly what you need for your facility’s toilets, all in one place.
Product Compliance and Suitability
The statements contained in this guide are intended for general informational purposes only. Such statements do not constitute a product recommendation or representation as to the appropriateness, accuracy, completeness, correctness, or currentness of the information provided. Information provided in this guide does not replace the use by you of any manufacturer instructions, technical product manual, or other professional resource or adviser available to you. Always read, understand, and follow all manufacturer instructions. Portions of this article were generated in part by ChatGPT, and edited by a member of the Zoro team.